A Complete DIY Fabric Dyeing Tutorial with Natural Indigo Plant Dye
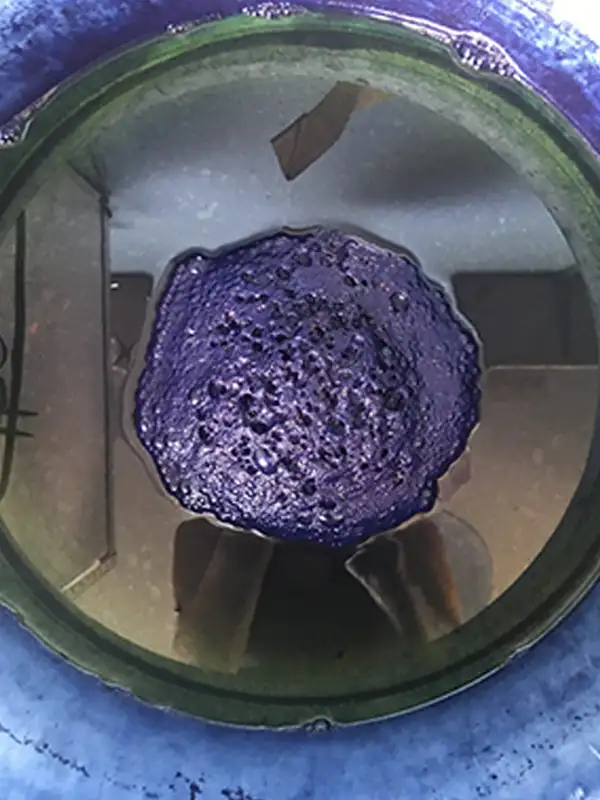
Indigo plant dye stands apart from any other natural dye. Unlike most, it doesn’t dissolve in water. Instead, it requires a carefully prepared alkaline solution with the oxygen removed before it becomes usable. This unique process makes indigo one of the most fascinating dyes in the world.
If you are familiar with the indigo dyeing process, you’ll recognise the blue pigment or indigo cakes like the ones you can find right here. But what is the source of this rich blue colour? A plant. One of the most well-known species, Indigofera tinctoria, has been cultivated for thousands of years. The leaves contain a chemical compound called indican, which transforms into vibrant blue dye through extraction and fermentation. Thriving in warm, humid climates, indigo-bearing plants grow abundantly in regions like India, South America, and Japan. However, they are not frost-hardy and require a long growing season.

Surprisingly, the plant itself offers no visual hint of the brilliant blue it holds within. Its light green leaves and delicate pea-like flowers seem unassuming. Extracting the dye requires a labour-intensive process: soaking the leaves, fermenting them, mixing with lime, and forming solid indigo cakes that can be stored long-term. Later, these cakes are ground into powder to create a dye vat.

Fabric Prep for Natural Indigo Plant Dye
If you’re dyeing fabric naturally with indigo plant dye, proper preparation is essential. If you buy an Indigo DIY natural dye kit, it will include a pre-scoured organic cotton scarf, ready to dye with no extra steps. However, if you’re working with other materials, follow these instructions to ensure the best results.
Before setting up your dye vat, you need to scour the fabric. Scouring removes grease, grime, and residues from production or storage. Clean fabric absorbs dye more evenly, producing smooth, vibrant colors. Some fabrics come “ready to dye” and only require a hot wash cycle.

How to Scour Fabric Before Dyeing with Natural Indigo Dye
Machine Wash: Run your fabric through a 40°C washing cycle.
Prepare a Scouring Bath: Place the wet fabric in a large pot with enough water for free movement.
Add Soap: Use a non-bio ecological soap like Ecover. Add about 40ml.
Heat the Fabric:
For plant-based fibers (cotton, linen, hemp): Bring to a boil, then simmer for one hour. Let it cool naturally.
For animal-based fibers (wool, silk): Slowly heat to a gentle simmer for one hour. Avoid boiling, as it can damage fibers.
Rinse and Repeat if Needed: Once cool, pour out the dirty water and rinse the fabric in clean water. If the rinse water is still dirty, repeat the process until it runs clear.
Pre-Soaking your Fabric
Before dyeing fabric naturally, pre-soak it in warm water. Soaking opens the fibers, helping them absorb the indigo plant dye more effectively. Let the fabric soak for at least one hour—longer if possible.
By properly washing, scouring, and soaking, your fabric will be ready to take on rich, lasting color from natural dyes like indigo plant dye.
Materials to Set Up Your Indigo Vat
Creating an indigo dye vat takes patience – remember, you will want to set aside a full day for this. We promise, the results are worth it! The Indigo Fructose Vat recipe that we use follows Michel Garcia’s 1-2-3 vat method, NS works best for cotton, linen, and hemp, ensuring rich, lasting color from indigo plant dye.

The ingredients that we use in this vat can all be found in our natural dye kit here, and include:
- 30g Organic natural indigo
- 60g Slacked lime (Calcium Hydroxide)
- 90g Fructose / fruit sugar
The materials for pattern making in the kit are:
- Elastic bands
- Lolly pop sticks
- Wooden beads
- Prepped organic cotton white scarf
You will also need:
- 1 litre jar (Kilner jars are ideal as they heat tempered.)
- Standard 10 -14 litre bucket
- Long wooden or metal spoon
- Rubber gloves, eg. household rubber gloves
- Apron
- Something to protect your floor if dyeing inside
- Any extra materials or things you would like to dye
- A dust mask or face covering
Making the base stock for your indigo dye vat
We’ll start by making a stock base for the vat. You’ll need:
- 30g indigo (1 part)
- 60g slaked lime (2 parts)
- 90g fructose (3 parts)
To mix the stock, use a 1-litre Mason jar or something similar. You’ll also need a 10-litre bucket or larger for when the stock is ready to add to your vat. Make sure the jar fits inside the bucket for easy mixing.
- Add 30g of indigo to the jar.
- Have a jug of hot tap water (about 140°F) ready. Pour a small amount into the jar and mix well until the indigo is fully combined. Slowly add more warm water until the jar is half full.
- Add the fructose slowly, stirring gently until dissolved.
- Gradually add the slaked lime, stirring continuously. It may clump at first—just keep stirring. Add a little more water if needed.
- Stir for about two minutes until well mixed, then top up with warm water, leaving about 5 cm of space below the rim.
- Stir again, then let the mixture settle. The stock solution should appear dark blue. Allow it to stand for about 60 minutes. During this time, fermentation will begin, bubbles will form on the surface, and slaked lime sediment will settle at the bottom.
Fructose helps remove excess oxygen from the indigo mix, while slaked lime makes the vat alkaline, allowing the indigo to dissolve effectively.

AFTER MIXING THE STOCK
Watch for the first bubbles on the surface—this confirms that fermentation has started. As the solution ferments, its color will change. It may look murky green at first and can shift to reddish-brown. Wait about 60 minutes, stirring gently every 15 minutes. The stock is ready when the liquid changes from dark greenish-blue to greenish-yellow, brownish-yellow, or even reddish-yellow, depending on the variety of indigo plant dye. It can be used immediately or stored for up to a week.
Below are two variations of how the stock can look once fermentation has happened. Your stock can look different depending on many factors like the water ph – there is not always a definitive separation.


Look for a cluster of bubbles forming on the surface (known as the indigo flower) along with a coppery metallic scum. If the color isn’t changing, stir gently, wait another 30 minutes, and check again. To speed up fermentation, place the jar in a basin of hot water. It’s normal to see sediment from the slaked lime at the bottom of the jar. Do not cover the jar while waiting for fermentation.
Once the stock is ready, fill your bucket about three-quarters full with very hot tap water. Stir the stock jar first, then gently add the stock to the water. To do this, lower the jar into the bucket and let the stock flow out slowly. Stir the vat in one direction until well mixed. The liquid should take on a dirty yellowish color. Let the vat settle for 30 to 60 minutes. You should see the indigo flower forming on the surface. The vat is ready for dyeing fabric naturally when the liquid turns a transparent greenish-yellow.

This is what the cluster of bubbles looks like.

Your natural Indigo Dye Vat when its ready
You are now ready to dye your fabric wiyth natural indigo plant dye!
- If you are planning to tie, bind, wrap or fold your fabric, be sure to do this first! If not, follow the steps do achieve a single shade of blue.
- Fill a separate bucket or sink with warm water and soak your fabric until it is fully wet. This step opens up the fibers, allowing them to absorb the dye evenly. Remove the fabric and squeeze out excess water. Once ready, take the damp fabric to the indigo vat.
- Wear gloves, as this is a highly alkaline vat. Gently scoop the indigo flower off the surface and set it aside for later.
- Submerge the squeezed-out fabric into the vat carefully to avoid adding extra oxygen.
- Once fully submerged, unfold and spread out the fabric under the surface to ensure even dye coverage. Gently squeeze the fabric while keeping it submerged. Let it sit in the vat for 5 to 10 minutes.
- After about 5 minutes, remove the fabric while squeezing it tightly to minimize splashing. The fabric will first appear the same color as the vat liquid but will transform from green to blue as it oxidizes in the air.
- Lay the fabric out to fully oxidize for about 20 minutes. To achieve deeper shades of indigo, repeat the dipping process. Otherwise, rinse and reveal your pattern immediately.

Troubleshooting Your Indigo Vat
If your vat turns blue instead of staying yellowish-green, it needs rebalancing:
- Add one tablespoon of slaked lime, stir until dissolved.
- Add two tablespoons of fructose, stir again, and let it rest for 30 minutes.
- If the indigo flower appears light blue instead of deep blue, your vat has run out of dye and needs refreshing.
To store your vat, cover it with a lid or plastic wrap and rebalance before the next use. When disposing of the vat, neutralize it by adding two cups of white vinegar, stirring, and flushing it down the drain with plenty of water.

Want to Learn More about Natural Indigo Plant Dye?
For a step-by-step video tutorial, click here.
You can find all the supplies you need to start dyeing fabric naturally in our DIY and indigo dye shop.
More great indigo resources:
Indigo dyeing is more than just a craft—it’s a connection to centuries of tradition and artistry. By following this DIY fabric dyeing tutorial, you can explore the beauty of indigo plant dye and experience the art of dyeing fabric naturally. Whether you’re aiming for delicate sky blues or deep midnight shades, the magic of indigo is in your hands. Happy dyeing!